


Creating The Perfect Rug In 10 Minutes
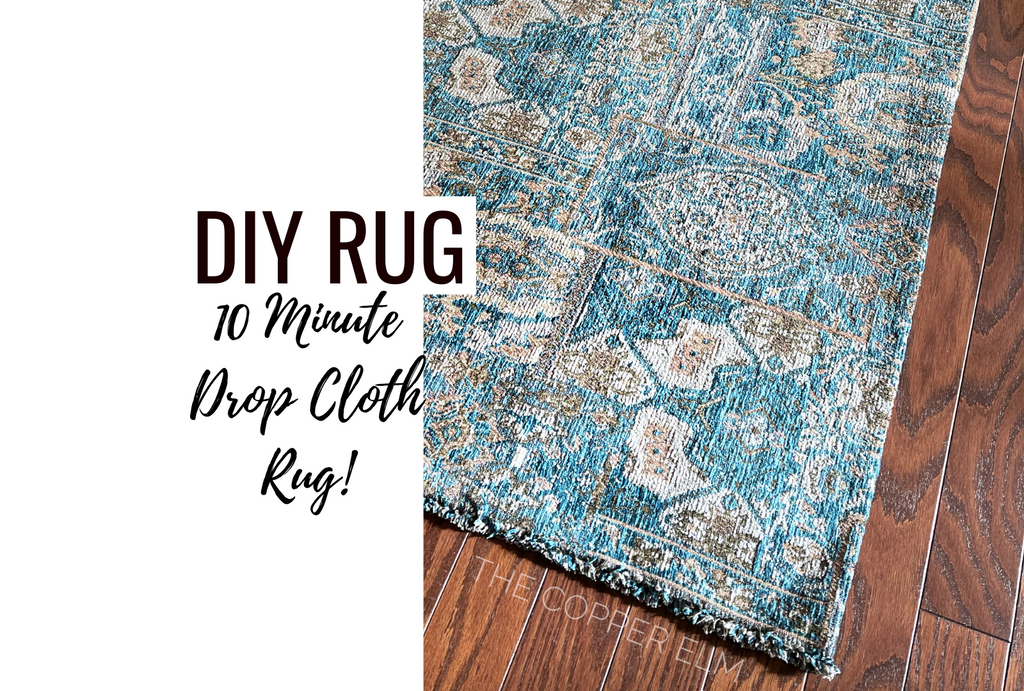
The perfect rug for a fraction of the cost...
As my camper renovation continues, I'm slowly reaching the fun part where I get to start choosing the small decorating details that will pull it all together. For the last few weeks, I've been scouring the internet for the perfect rug to tie all my design visions together...and I'm coming up empty-handed time after time. I want a rug with a little pop of color to balance the overall monochromatic look I've created. But I also wanted something that felt warm and welcoming without the stiffness or height of a machined rug. When pricing out my options, there was a significant difference between a rigid, padded, run-of-the-mill rug and a hand-loomed, pliable, frayed-edged one. For $40-60, I could get something from a big box store that would bring in some color but leave me wishing for more character. The few times I saw a rug that had that hand loomed feel I'm searching for, the price jumped up a hundred dollars or more. My budget for this renovation is extremely tight so this just wasn't an option. Time to get creative...

I scoured Pinterest for some options that would fit my price range AND my vision a little better, and I found plenty of DIY ideas. There are round rugs made from twine, colorful pompom throws that have tons of texture, and of course the old favorites made from strips of fabric for the classic rag rug. None of these met the design requirements I had in my head though and I was beginning to think my options were restricted to buying a traditional rug...until I saw a few blogs that showed spray adhesive and canvas drop cloths. Most included guidelines to hem all the edges and sew on tassels or trim and plenty of other things I either didn't have on hand or didn't have the self-confidence to tackle. But why make things harder than they have to be?? Let's do this the easy way.
What you need:
The supplies are inexpensive and easy to find.
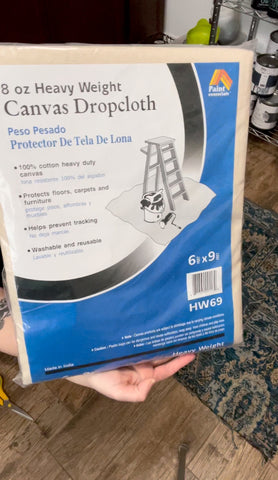
- A canvas drop cloth (snag one on Amazon here)
- A fabric you like (I chose a med/heavy upholstery fabric that I had leftover from a dining set I refinished)
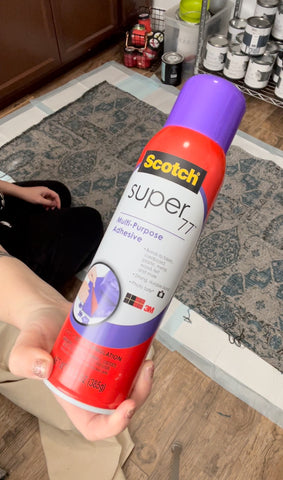
- Spray adhesive (I used this one, although it's cheaper in stores)
- Scissors
- If you want to get fancy you can also use a ruler or measuring tape to make sure things are super even. I just eyeballed most of it.
Steps:
- Cut your fabric to the size and shape you want your rug to be. For any side that you plan to have a nice hem, you'll want to add 1"-2". My fabric had a super even fray on the ends that I was planning to accentuate, so those sides didn't need any extra length. The two long sides however would need to be "hemmed" so I added a few inches to my width.
- Cut your canvas dropcloth. You'll want your drop cloth to be the same shape as your piece of fabric, just a few inches smaller so you can fold over any edges that need to be hemmed.

- Cover your workspace with plastic, a drop cloth, puppy pads, newspaper, anything that will protect your floor. This isn't a super messy project, but you will have a little bit of adhesive overspray, so it's important to protect your flooring.
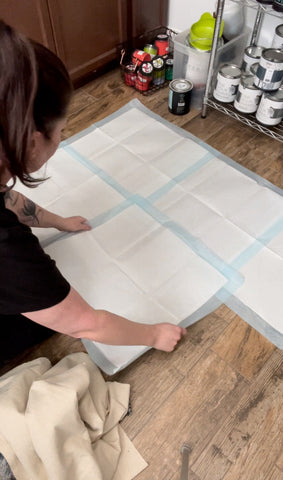
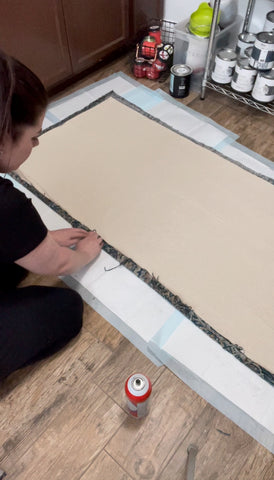
- Lay your fabric down first, pretty side down. Smooth it all out, getting rid of any wrinkles or creases.
- Lay your canvas drop cloth down on top of your fabric. Even everything out and double-check that it fits well and has enough space to fold the edges of the fabric over. Again, smooth out the material to make sure there are no major wrinkles.
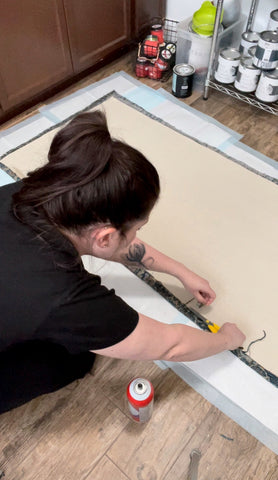
- Fold back part of the drop cloth and begin applying the spray adhesive to your fabric. You'll want to lay this on fairly heavy and then fold the drop cloth back over the fabric and press down firmly. Move on to the next area and repeat the process.

- Once the entire drop cloth is glued down to your fabric, all wrinkles are smoothed out, and you are happy with the placement, it's time to fold over the edges. When I created my rug, I sprayed the adhesive on both the fabric AND the drop cloth before folding the edges over. Looking back, I have some regrets and wish I had aimed my adhesive closer and focused only on the fabric. By spraying the drop cloth, I had some overspray onto areas of the canvas that would not have fabric glued to them. This left exposed areas fairly sticky. (Although, after a day of drying, they have lessened quite a bit, and a sprinkling of talcum powder would easily remedy the rest). Focus your adhesive onto the exposed fabric and then firmly fold it over the canvas and press down to create a hem. Do this on all sides that require a hem.
- Cut off any straggling threads to clean up all of your edges and hems for a more professional look.
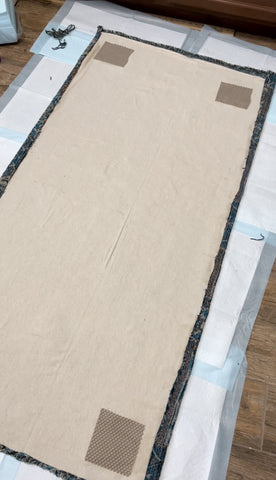
- At this point, I highly recommend weighing the drop cloth down with books or weights of some sort and allow it to dry overnight. The thicker your fabric is, the harder it will be for the drop cloth to adhere to it, so adding some weight to it during the drying process will help keep the materials together.
Once your glue is dry, it's all finished. Flip your rug over and enjoy! My rug is going to be in a travel trailer, so to prevent it from slipping, I added some rubber to the backside. I contemplated purchasing rug grippers, but after close inspection, I realized most are no different than your standard shelf liner. Since I had shelf liner on hand, I opted to simply cut a few squares of it and glue them to the back corners of my rug for extra security. There's a chance these may leave a residue on the flooring in my camper if the temps are too high, but I'm not too worried. A little goo gone will likely fix it right up.
Will this rug last forever? Probably not. But it is adorable, easy to make, and inexpensive. Using scrap fabric and spray adhesive I already had on hand, I only had to purchase a new drop cloth, costing $10. Considering I only used a quarter of the drop cloth and will happily use the rest during painting projects, this project cost me about $2.50. If you add in the actual cost of that scrap piece of fabric, we are looking at a total of about $8.50. Not too bad for a gorgeous new rug.
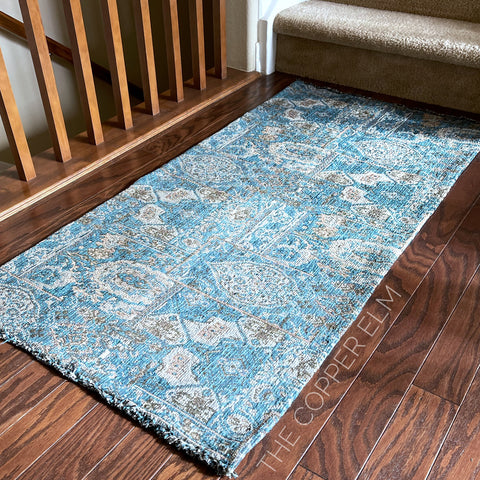
I don't think I would trust this rug in the washing machine so it will likely be a spot treat only type of thing...but that totally works for what I am needing. If you need a rug for your front door, your back porch, your camper, or anywhere else that you don't want to invest a ton of money into...this is a total win. If you love this idea but you want something more durable that will last a lot longer, you could sew all the hems or use an iron-on hem to create a better seal. This is one of those projects that would be super easy to modify to your needs, so don't feel locked into any particular set of rules! The whole project takes about 10 minutes so don't let yourself feel too rigid with it...have fun and create something that works great for you!
(This post may contain affiliate links. These links don't cost you an extra penny, but clicking them to check out products and make your purchases helps my small business out in huge ways. I ALWAYS stand behind my recommendations and I don't promote products that I don't truly believe in. Thanks so much for the support!)
-
Posted in
Camper Renovation, DIY Projects


