Perfect Lines With Tape And Enamel
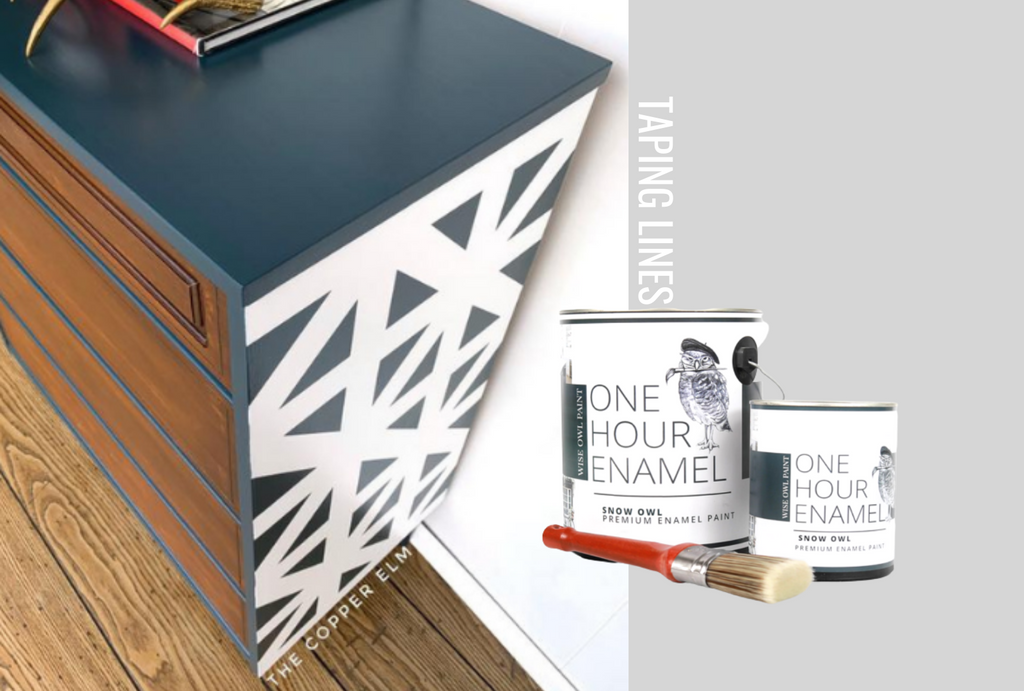
Painting Flawless Lines with Yellow Frog Tape and Wise Owl Enamel
I've done a lot of stencils in my day, and just about every single one of them has caused some sort of hiccup. The paint bleeds under the tape, the tape rips off the previous layer of paint, the coverage isn't great...It just never turned out perfect. Until now. And oh my gosh is it perfect. I switched up my technique, my products, and my timeline and it made ALLLLL the difference! If you are looking to create a gorgeous pattern to accent your mid-century furniture, this is for you!!

The absolute must-have products:
1) Painter's tape - Specifically, Frog Tape, and even more specifically it MUST be the yellow one! It is meant for delicate surfaces and will ensure crisp lines without pulling up your previous coats of paint. For me, this is non-negotiable!
2) Rollers - I've done plenty of stencils with brushes, sponges, dabbers, you name it....but this technique was SO much easier and worked flawlessly. To get a super smooth finish, I used the Whizzflock 4" rollers. (You'll need separate rollers for each color you plan to use) Foam rollers are awesome, but for this technique, nothing beats the flocked roller.

3) Paint - To get the pattern on smoothly, quickly, and be able to remove the tape without damaging the design, I used Wise Owl's One Hour Enamel. It dries rock hard in no time, self-levels flawlessly, and has incredible coverage. Bonus: the topcoat is built-in, so when you pull that tape off...you are done!!
Now that you've got all your supplies, it's time to paint!! Follow these steps and you'll have a super crisp design in no time flat!
- Prep & Paint Your Base - You'll need to properly prep your piece before you begin, so clean it well, rinse off any cleaning residue, scuff sand the surface, and give it a good coat or two of Wise Owl Primer. Once you've got a great surface to work on, it's time to paint! You can use a roller or a brush, whichever you feel most comfortable with....apply a coat of One Hour Enamel, allow to dry for one hour, then apply a second coat.
- Allow Adequate Dry Time - The One Hour Enamel, as the name implies, cures 90% in one hour. This is unheard of in the enamel world, makes painting a breeze, and drastically cuts down on your waiting time. But for best results when stenciling, I recommend giving the paint a few extra hours of cure time before applying your tape. I let mine dry overnight and it worked great!
- Apply Tape - This step can be as artistic and freeing OR as mathematical and strategic as you'd like. Find a pattern you love and get to work! Tape as little or as much as you prefer and then take a few extra minutes to apply a little pressure to each piece of tape with your fingertips. You'll want to push all the edges down flush with your surface.

- Apply Base Coat - Grab your roller and give it a quick dip in your base coat color. (I used Snow Owl) Then roll it into a tray (I line mine with a grocery bag for super easy clean up) to remove as much excess paint as possible. Once you've got an evenly, but not overly, saturated roller, go ahead and roll it onto your taped surface. You don't need to worry about complete coverage or direction just yet. Your main goal is to get paint onto all the paint edges to seal them and prevent bleed thru. One thin coat is plenty! If you have bubbles in your paint from the roller, let them sit for 30 seconds and then do a VERY light pass with the roller again. This pass will pop all your bubbles and smooth out the surface.
- Allow to Dry - I gave mine a good 30 minutes and once it was plenty dry to the touch, I was ready to add my contrast color. If you live in a humid climate, or the temperature is a bit lower, you'll want to allow for a bit more dry time. You want that base coat to be nice and dry so your next pass with a roller doesn't lift it up.
- Apply Contrast Color - Grab a clean (dry) roller and dip it into your contrast color. Roll-off any excess into a tray and then apply a light and even coat to your taped surface. The key to a great design is to keep the paint coats light so they don't drip or leak. For this piece, I did three coats of Poseidon, with the final coat being slightly heavier than the first two. I was careful to only roll in long, even, strokes to ensure a nice smooth surface with no contrasting lines. I allowed them to dry for approximately 20 minutes before moving on to the next coat.
- Remove Your Tape - As soon as my final coat of paint was applied, I went ahead and removed my tape. Pull the tape off at a 45-degree angle to avoid damaging the paint underneath and work slowly so you don't accidentally bump your saturated tape into an area you didn't want your contrast color to be! (I speak from experience!)
- Step Back and Admire Your Work - You're all done!! Let the paint dry for a good hour before you move your furniture and be gentle with it for the first few weeks.

If you give this a go, I'd love to see your results! And as always, if you have any questions or need help in any way, please reach out!! You can comment here or shoot me a note on the Contact page and I'll get back to you ASAP!
(This post may contain affiliate links. These links don't cost you an extra penny, but clicking them to check out products and make your purchases helps my small business out in huge ways. I ALWAYS stand behind my recommendations and I don't promote products that I don't truly believe in. Thanks so much for the support!)
-
Posted in
One Hour Enamel, Painting Techniques, Stencils & Lines





Really interesting post!
With such simple tools such as these you can already create a very good design! There’s a reason why geometric shapes look good, that’s because it aesthetically pleasing and extremely satisfying to look at.