


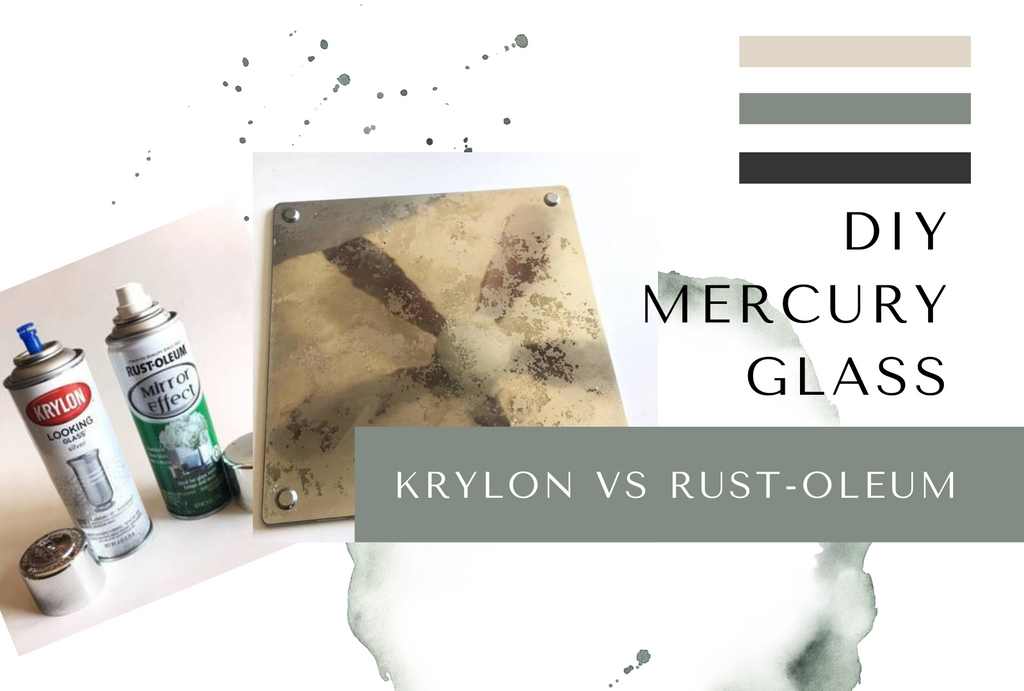
DIY Mercury Glass - Krylon vs Rust-Oleum

Faux Mercury Glass!
I'm working on a beautiful console table with a glass insert top and knew from the moment I saw it, that I wanted to try out a faux mercury glass finish. I'd never done this technique before, so I scrolled through Pinterest to search for tutorials. It turns out that creating a mercury glass look is pretty simple, only requires a few products, and can be done in a short amount of time. I was sold! What I wasn't so sure about was which product I should use. A lot of tutorials recommend Krylon Looking Glass spray paint, while others swear by Rust-Oleum Mirror Effect, (link shows Mirror Effect in gold because Amazon is currently not selling the silver. I'll update as soon as it becomes available!) but I couldn't find a clear side by side comparison of the two. Since this is going to be used on a piece I'll be listing for sale, I wanted to try both and decide for myself which gives the best results.

What do you need?
I ran to Home Depot to buy The Rustoleum spray and headed to Walmart to get Krylon. Both come in a significantly smaller can than your typical spray paint and cost quite a bit more (just under $9 a can for each brand). But for a gorgeous mercury glass finish on a tabletop? $9 isn't too awful. Especially when you factor in the cost of the other products required. Chances are, you've already got everything else needed on hand, bringing your additional costs down to zilch. You'll need some paper towels, a spray bottle, some water, a bit of vinegar, and glass. That's it! For a little extra touch, I added in a bit of black spray paint at the end, but that is optional. Now, on to the steps and the side by side comparison!!
Step by Step-
1. Set up a workspace. This is spray paint, so you will have some overspray. I laid down some paper, put my glass panels down, and got to work. (TIP! Be sure to put your glass face down! You want to do all of your painting on the backside of your glass. When you are all finished, you will flip your glass over to see your final result!) You'll want everything nearby because this paint dries fast and you won't have a ton of time in between coats. If you are using the Krylon paint, grab a flat head screwdriver to pry the top off the can....that lid is no joke!! (The Rust-Oleum lid pops right off)
2.Spray a thin coat of your mirror spray paint onto your glass. I immediately noticed a difference in the two sprays. The Krylon spray goes on in a much finer mist, sprays evenly, and doesn't pool. But oh my gosh does it stink!! Get some ventilation, wear a mask, or do this outside! I was working in the basement and the entire house smelled for hours. The Rust-Oleum spray has a different nozzle and the spray puddled up multiple times. (You can see in the photo, after the first coat, the Rust-Oleum is splotchy!) It took a lot more effort to get an even spray, with some spots being overly saturated while other spots were bare. On the plus side, it didn't smell nearly as bad as the Krylon.
3.Let the paint dry for 1 minute. Both cans recommend 1 minute, but Krylon dried faster. You can see it drying before your eyes. The Rust-Oleum took a bit longer, but part of that may have been because it sprayed so much heavier.
4.Paint 5 thin layers, allowing it to dry for 1 minute between each layer.
5.When you are satisfied with your coverage and have a consistent, mirrored look, it's time to grab the vinegar!! I used a spray bottle and made a mixture of equal parts tap water and vinegar. No need to measure, this isn't an exact science. Just eyeball a 50/50 mix. Set your spray nozzle to a semi-fine mist and spray it on top of your paint. Let it sit for a few minutes (I waited 5 minutes) and it will begin to eat through your mirror paint.


6.Fold up a paper towel and spray it with your vinegar solution. Gently pat it onto your glass. Your paper towel will pull up the bits of paint that the vinegar touched, leaving little spots in the finish. This is where your mercury glass look will start to appear! Now is where your artistic touch comes into play. You can do as much or as little as you'd like, the more you pat, the more paint comes off. This is where a clear difference showed in the two brands of paint. The Krylon came off in tiny speckles, exactly where the vinegar had splattered. The Rust-Oleum came off in much larger pieces and looked like I had wiped it off completely in some areas. There was a ton of paint on the paper towel for the Rust-Oleum and hardly any at all on the Krylon paper towel.

7.You can stop here if you are happy with your mercury glass! For a little more dimension, I chose to do another thin coat of mirror paint, careful to not over-saturate. I wanted some areas with heavier paint, some thinner, and some missing paint altogether, to give a more authentic aged look.
8.This step is completely optional: When everything was fairly dry (I waited ten minutes; this stuff dries quick!) I went back over everything with a very thin coat of black spray paint. In true mercury glass, there are small speckles of black mixed in with the silver and the clear glass. I did a quick thin coat with basic black spray paint and called it a day!


That's it!! Super easy, right? I was pretty happy with both final products, but I had a clear winner. In the end, I like the look of the tiny speckles of clear glass much more than the large spots. And because of that, I'm choosing to use the Krylon Looking Glass spray for my project. In addition to that, the Krylon also won me over with how evenly it sprayed. The Rust-Oleum was harder to control, puddled, and created a more inconsistent look overall. The only downsides to the Krylon product were the awful smell and how much effort it took to get the lid off (but I fully admit, that could have just been user error). If I was in a pinch and only had access to Rust-Oleum, I'd use it! But if I had my choice, and in this day and age of good old Amazon, we do, I'd go with Krylon hands down.
For my glass table, the faux mercury effect will be on the underside of the glass, where it will never encounter any contact. The odds of it getting scratched or damaged are very slim. Besides, these paints all adhere fairly well to glass so the need for a topcoat is pretty low. If you are using this on the top of a glass surface that will take some abuse, it may be wise to finish with a crystal clear varnish for extra durability.

Need a quick recap?
- Set up your workspace and protect it from overspray. Get all products collected.
- Spray a thin layer of mirrored spray paint onto glass and allow it to dry for one minute.
- Repeat for a total of five layers.
- Spray a fine mist of 50/50 water and vinegar.
- Wait 5 minutes and blot with a damp paper towel to remove areas of paint
- For a more aged look, spray a thin layer of black spray paint over the entire surface.
Want to watch as I work on the tabletop? Check out the video below!
(This post may contain affiliate links. These links don't cost you an extra penny, but clicking them to check out products and make your purchases helps my small business out in huge ways. I ALWAYS stand behind my recommendations and I don't promote products that I don't truly believe in. Thanks so much for the support!)
-
Posted in
Faux Finishes, Mercury Glass, Painting Techniques, Product Reviews


